For Revit users, mastering Lumion can significantly elevate your architectural visualizations. Lumion, a high-end rendering software, transforms static Revit models into dynamic, photorealistic scenes. Here, we'll delve into the basics of Lumion and how to use it effectively with Revit.
What is Lumion?
Lumion is a visualization software that allows architects to create beautiful 3D renderings and animations of their designs. Known for its ease of use and real-time rendering capabilities, Lumion helps bring your projects to life.
Key Features of Lumion
Real-Time Rendering: View changes and adjustments instantly, enhancing productivity and collaboration.
Extensive Material Library: Access a wide range of materials to enhance your models, ensuring they look realistic and detailed.
Lighting and Shadow Effects: Create realistic lighting scenarios and shadows that add depth and realism.
Landscape Tools: Add realistic outdoor environments to your models, making them more immersive.
Animation Tools: Bring your designs to life with animations that showcase functionality and user interaction.
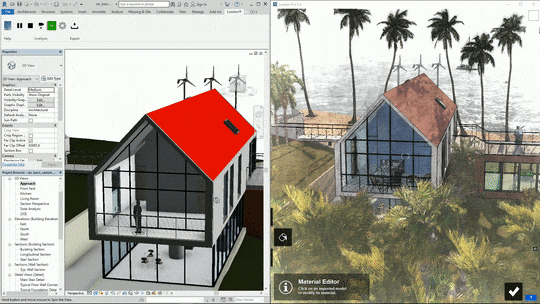
Image source - apps.autodesk.com
Why Use Lumion with Revit?
Integrating Lumion with Revit combines the precision of Revit’s design capabilities with Lumion’s advanced visualization features, providing numerous benefits.
Enhanced Visual Communication
Using Lumion with Revit enhances visual communication through photorealistic renders, immersive walkthroughs, and real-time feedback. These capabilities make it easier to convey design concepts and receive client input.
Photorealistic Renders: Produce high-quality images that help clients visualize the final product.
Immersive Walkthroughs: Create walkthroughs that allow clients to explore the design interactively.
Real-Time Feedback: Make adjustments in real-time, improving the design process.
Streamlined Workflow
Lumion integrates seamlessly with Revit, streamlining your workflow from design to visualization. The LiveSync feature ensures changes in Revit are updated in Lumion in real-time.
Seamless Integration: Import Revit models directly into Lumion without losing detail.
LiveSync Feature: Sync changes made in Revit with Lumion in real-time.
Material Mapping: Preserve Revit’s material assignments during import for consistency.
Getting Started with Lumion
System Requirements
Before diving into Lumion, ensure your system meets the necessary requirements for optimal performance. This includes having a powerful processor, sufficient RAM, and a compatible graphics card.
Operating System: Windows 10 (64-bit)
Processor: Intel/AMD with at least 4 cores
RAM: Minimum 16 GB, recommended 32 GB
Graphics Card: DirectX 11 compatible, with at least 8 GB VRAM
Installation Process
Installing Lumion is straightforward. Follow these steps to get started:
Download Lumion: Visit the official Lumion website and download the installer.
Run the Installer: Follow the on-screen instructions to install the software.
Activate License: Enter your Lumion license key to activate the software.
Navigating the Lumion Interface
Understanding the Lumion interface is crucial for efficient workflow. The interface is designed to be intuitive, making it easy for users to navigate and utilize its features.
Main Components of the Interface
Main Menu: Access settings, save/load projects, and other core functions.
Viewport: The central area where your 3D model is displayed and manipulated.
Toolbars: Located around the viewport, providing quick access to various tools and features.
Library Panel: Contains materials, objects, effects, and other assets.
Customizing the Workspace
Lumion allows customization of the workspace to suit your preferences, enhancing productivity.
Adjust Toolbars: Rearrange toolbars for easy access to frequently used tools.
Change Backgrounds: Customize the background settings to suit different project needs.
Save Layouts: Save your customized workspace layout for future use.
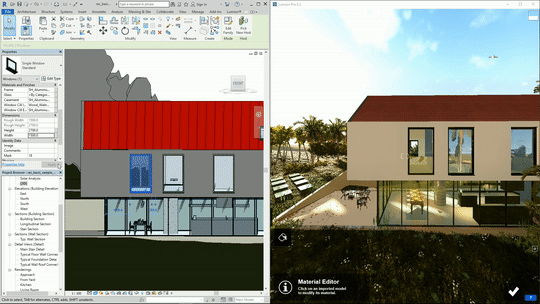
Image source - apps.autodesk.com
Importing Revit Models into Lumion
Exporting Models from Revit
To bring your Revit models into Lumion, you need to export them in a compatible format.
Prepare the Model: Clean up your Revit model, removing unnecessary elements to optimize performance.
Export Settings: Use the ‘Export to Lumion’ add-in or export the model as a Collada (.DAE) file.
Check Materials: Ensure that materials are properly assigned and named for seamless import.
Importing into Lumion
Once you have your Revit model ready, importing it into Lumion is straightforward.
Open Lumion: Launch Lumion and create a new project.
Import Model: Use the ‘Import Model’ button to load your exported Revit model.
Adjust Settings: Configure the import settings, such as scale, position, and orientation.
Optimizing Your Models in Lumion
To ensure smooth performance and high-quality renders, it’s essential to optimize your Revit models for Lumion.
Simplify Geometries
Simplifying complex geometries helps reduce rendering times and improve performance.
Remove Unnecessary Details: Eliminate small, detailed elements that are not crucial for visualization.
Merge Objects: Combine multiple objects into single entities where possible.
Optimize Textures: Use lower resolution textures for less important areas.
Reduce File Size
Large files can slow down Lumion, so reducing the file size is beneficial.
Clean Up the Model: Remove unused components and materials.
Use Instances: Replace repeated elements with instances to save memory.
Adjust Detail Levels: Use Lumion’s detail level settings to manage the complexity of the scene.
Mastering Lumion's Rendering Capabilities
Lumion’s rendering engine is powerful and versatile, enabling the creation of high-quality visualizations.
Photorealistic Rendering
Achieving photorealistic results involves mastering Lumion’s rendering settings and techniques.
Material Adjustments: Customize materials to achieve the desired look.
Lighting Setup: Use natural and artificial lighting to enhance realism.
Camera Settings: Adjust camera angles, depth of field, and other settings for optimal renders.
Interactive Design Process
Lumion supports an interactive design process, allowing for rapid iteration and feedback.
Real-Time Updates: See changes in real-time as you adjust materials, lighting, and other elements.
Client Collaboration: Use Lumion to present designs interactively, receiving instant feedback from clients.
Design Exploration: Experiment with different design options quickly and efficiently.
Creating Realistic Materials in Lumion
Using the Material Library
Lumion’s material library is extensive, providing a variety of realistic textures.
Browse Materials: Explore the library to find suitable materials for your model.
Apply Materials: Drag and drop materials onto your model’s surfaces.
Customize Properties: Adjust properties like reflectivity, transparency, and bump mapping.
Custom Materials
Creating custom materials allows for more unique and tailored visualizations.
Import Textures: Use your own textures for custom materials.
Adjust Settings: Fine-tune the material properties to match your design requirements.
Save Presets: Save custom materials as presets for future use.
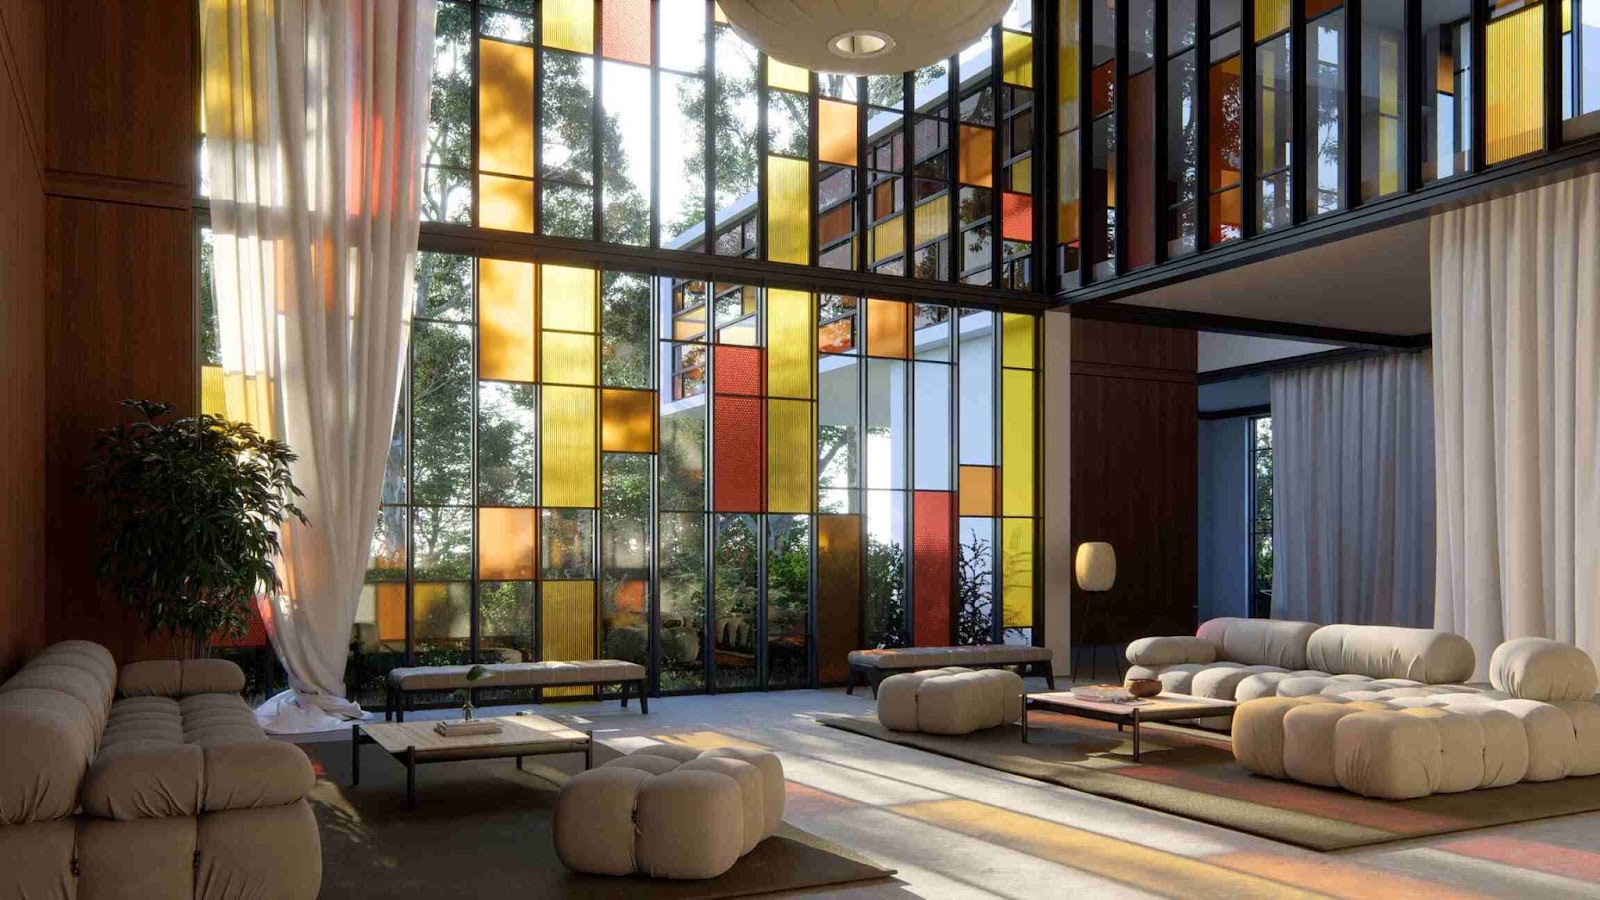
Image source - a.storyblok.com
Enhancing Lighting and Shadows
Natural Lighting
Natural lighting adds realism to your renders and highlights architectural features.
Sun Position: Adjust the sun’s position to simulate different times of day.
Weather Effects: Use weather settings to add clouds, fog, and other atmospheric effects.
Global Illumination: Enable global illumination for realistic light bounces and shading.
Artificial Lighting
Artificial lighting is essential for interior scenes and night-time visualizations.
Place Light Sources: Add spotlights, area lights, and other artificial light sources.
Adjust Intensity: Control the brightness and color of each light source.
Shadow Quality: Fine-tune shadow settings to enhance realism.
Adding Landscaping Elements
Vegetation and Trees
Lumion’s landscaping tools enable the addition of natural elements to your scenes.
Plant Library: Access a variety of trees, shrubs, and plants.
Placement Tools: Use placement tools to add and arrange vegetation.
Growth Settings: Adjust growth stages and density for a natural look.
Terrain Modification
Modify the terrain to match the landscape requirements of your project.
Terrain Editing: Use terrain tools to create hills, valleys, and other features.
Water Elements: Add lakes, rivers, and ponds to enhance the scene.
Pathways and Roads: Integrate pathways and roads seamlessly into the terrain.
Utilizing Lumion's Object Library
Furniture and Interior Objects
Populate your scenes with detailed furniture and interior objects.
Object Placement: Drag and drop objects into your scene.
Customization: Adjust object properties and placement for realism.
Object Variations: Use different variations to avoid repetition.
Exterior Objects
Enhance your outdoor scenes with exterior objects.
Vehicles and People: Add animated vehicles and people to bring your scene to life.
Street Furniture: Include streetlamps, benches, and other elements for detail.
Outdoor Decorations: Use decorations like signs and sculptures for added interest.
Animating Models in Lumion
Basic Animation Techniques
Animating your models can showcase design functionality and interaction.
Keyframe Animation: Use keyframes to animate object movement.
Path Animation: Create paths for objects to follow, like vehicles or people.
Camera Animation: Animate camera movements for dynamic walkthroughs.
Advanced Animation
For more complex animations, Lumion offers advanced tools.
Object Sequencing: Sequence multiple animations for coordinated movement.
Time Control: Adjust the timing and speed
Object Sequencing: Sequence multiple animations for coordinated movement. This technique is particularly useful for showing how different parts of a project interact over time.
Time Control: Adjust the timing and speed of animations to match specific project requirements. This allows you to create animations that precisely illustrate design features or operational sequences.
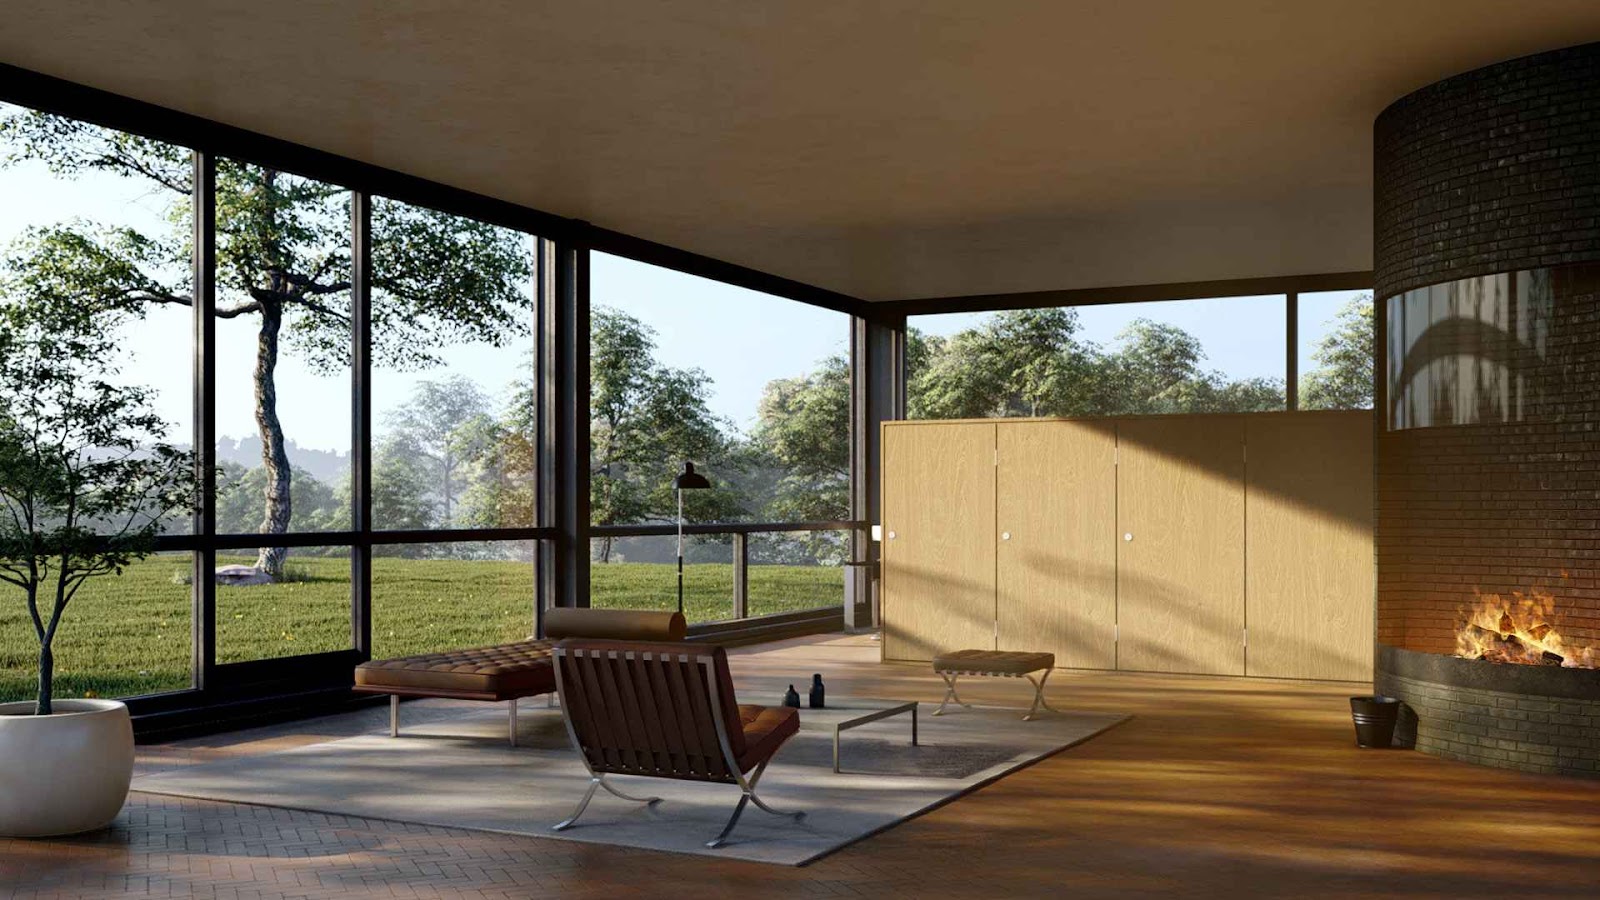
Image source - a.storyblok.com
Outputting Your Work
Once your project is complete, Lumion provides several options for rendering and exporting your work. These options enable you to share your visualizations in various formats suited to different purposes.
Rendering Images
Rendering high-quality images is a primary function of Lumion. To achieve the best results:
Image Settings: Adjust the resolution, aspect ratio, and quality settings to match your needs. High-resolution images are ideal for print and presentation, while lower resolutions might be sufficient for quick previews.
Export Formats: Choose from various formats like JPEG, PNG, or TIFF. Each format has its advantages; for example, TIFF is ideal for high-quality prints, while JPEG is more suited for web use.
Batch Rendering: Utilize batch rendering to process multiple images simultaneously. This feature saves time by allowing you to produce several images in one go, which is particularly useful for creating variations of a scene or different lighting conditions.
Rendering Videos
Creating videos is another powerful feature of Lumion. It enables the production of dynamic presentations that can effectively convey the spatial experience of your design.
Video Settings: Set resolution, frame rate, and quality to match your desired output. Higher resolutions and frame rates result in smoother and more detailed videos, but they require more processing power and time.
Export Formats: Export videos in formats such as MP4, AVI, or MOV. MP4 is widely supported and offers a good balance between quality and file size, while AVI and MOV can be used for higher-quality outputs.
Post-Processing: Use Lumion’s post-processing tools to enhance video quality. Adjust brightness, contrast, and color balance to achieve the desired look and feel for your video.
Conclusion
Mastering Lumion elevates your architectural presentations. By combining its power with Revit, you create stunning visuals that captivate clients and stakeholders. From initial design concepts to final presentations, Lumion's real-time rendering and extensive features streamline your workflow and enhance decision-making. Embrace this tool to differentiate your work and achieve exceptional results.
Level up your Revit game! Master Lumion for captivating architectural renders & animations. Join our Professional Revit & BIM Certification Course today!
Visit the Kaarwan website for more insights!