Integrating Revit with Lumion transforms architectural designs into captivating visual presentations. Revit, known for its impressive BIM capabilities, provides detailed and accurate models. Lumion, with its real-time rendering features, enhances these models into stunning visualizations. This guide explores how to seamlessly combine these tools, providing practical steps, tips, and insights to elevate your architectural presentations.
Understanding Revit and Lumion
Overview of Revit
Revit is a leading BIM (Building Information Modeling) software developed by Autodesk. It supports a wide range of architectural, structural, and MEP (Mechanical, Electrical, and Plumbing) design processes. Revit’s strength lies in its ability to create detailed, data-rich models that integrate various aspects of building design into a cohesive whole. This allows architects and engineers to visualize complex projects with high accuracy.
Introduction to Lumion
Lumion is a visualization tool designed to transform Revit models into high-quality visual presentations. It offers an intuitive interface and powerful rendering capabilities, making it easier to create photorealistic images and animations. Lumion’s real-time rendering and extensive library of materials and effects enable users to showcase their designs in a realistic and engaging manner.
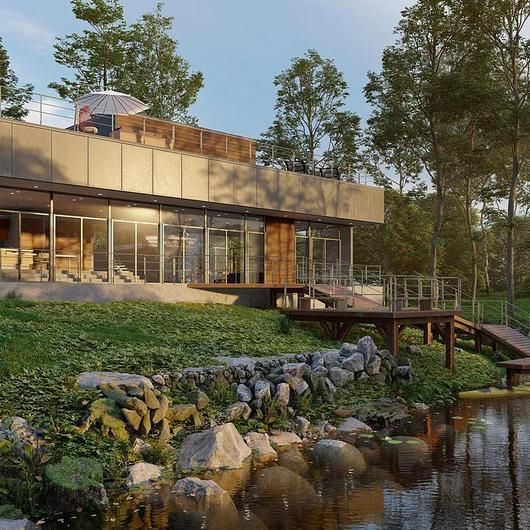
Lumion render_©archdaily.com
The Benefits of Integrating Revit with Lumion
Why Integration Matters
Integrating Revit with Lumion streamlines the workflow from detailed modeling to impressive visualizations. This connection ensures that changes in Revit models are accurately reflected in Lumion, reducing the need for manual adjustments. The synergy between these tools enhances the overall design presentation process, allowing for a more efficient and effective communication of design ideas.
Advantages of Combining Revit and Lumion
Combining Revit with Lumion offers several significant benefits:
Enhanced Visualizations: Lumion’s rendering capabilities bring Revit’s detailed models to life with photorealistic effects.
Improved Communication: High-quality visualizations help clients and stakeholders better understand and engage with the design.
Faster Production: The integration reduces the time needed to create visual presentations by automating many aspects of the rendering process.
Preparing Revit Models for Lumion
Optimizing Revit Models
Before importing Revit models into Lumion, it’s crucial to optimize them. This involves simplifying complex geometries and removing unnecessary elements. By streamlining the model, you improve performance and ensure a smoother import process. Optimization helps maintain the model’s integrity and prevents issues such as missing textures or performance slowdowns.
Export Settings and File Formats
Proper export settings are essential for a successful transition from Revit to Lumion. Lumion supports various file formats, including FBX and DAE. To ensure compatibility:
Select the Right Format: Choose a file format supported by Lumion.
Adjust Export Settings: Ensure that textures and materials are preserved during export.
Check for Scale and Orientation: Verify that the model is correctly scaled and oriented in Lumion.
Setting Up Your Lumion Project
Importing Revit Models into Lumion
Importing Revit models into Lumion involves a few key steps. Start by selecting the appropriate file format and adjusting the import settings as needed. Lumion’s user-friendly interface simplifies this process, allowing you to position and refine the model within the scene. Proper import settings are crucial for maintaining model accuracy and achieving the desired visual results.
Configuring Lumion Project Settings
After importing the model, configuring the project settings in Lumion is vital. This includes adjusting environmental settings such as:
Lighting: Set up natural and artificial light sources.
Weather: Choose appropriate weather conditions to match the project’s context.
Time of Day: Select the time of day to enhance the visual impact.
These settings contribute significantly to the realism and effectiveness of the final visualization.
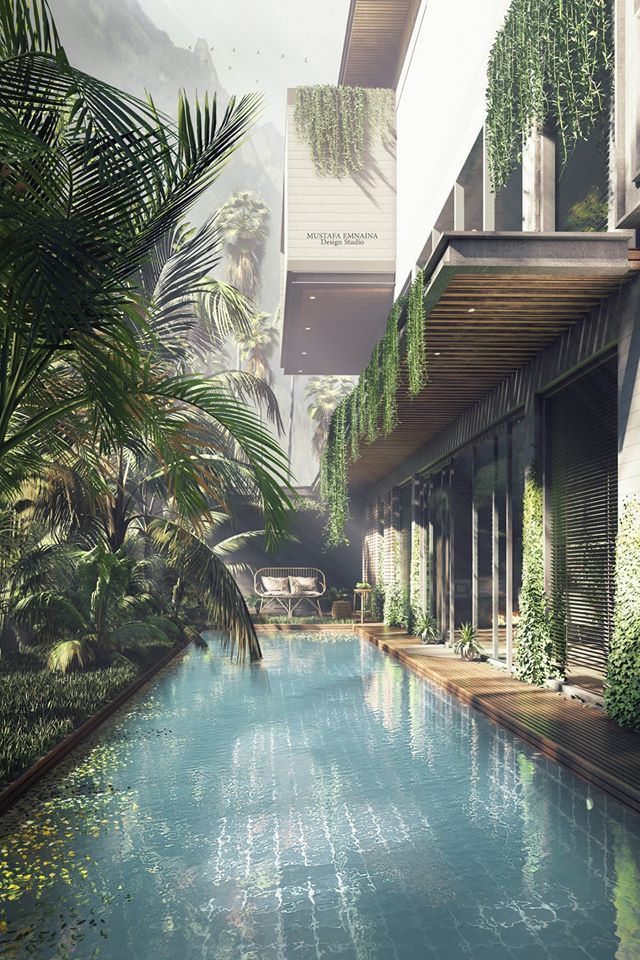
Lumion render_©community.lumion.com
Enhancing Your Visuals in Lumion
Applying Materials and Textures
Lumion’s extensive library of materials and textures allows for significant customization of Revit models. Applying these materials accurately enhances the visual appeal of the model. To achieve a photorealistic look:
Choose Appropriate Materials: Select materials that match the design intent.
Apply Textures Correctly: Ensure textures are applied accurately to prevent distortions.
Create Custom Materials: Use Lumion’s tools to create or modify materials as needed.
Lighting and Shadows Techniques
Effective use of lighting and shadows is crucial for realistic renderings. Lumion offers various lighting options to illuminate the model:
Natural Lighting: Simulate sunlight and its effects on the model.
Artificial Lighting: Add interior lights and other artificial sources to enhance visibility.
Shadows: Adjust shadow settings to create a more lifelike appearance.
These techniques help to create engaging and realistic visualizations.
Creating Stunning Renderings
Using Lumion’s Render Features
Lumion provides advanced rendering features to produce high-quality visuals. These include:
Post-Processing Effects: Enhance images with effects such as bloom and depth of field.
Image Enhancements: Adjust color, contrast, and exposure to improve visual appeal.
Tips for High-Quality Renderings
To achieve the best results:
Ensure Model Accuracy: Verify that the Revit model is well-prepared before rendering.
Optimize Render Settings: Adjust settings such as resolution and quality to balance performance and visual fidelity.
Use Lumion’s Effects: Apply appropriate effects to enhance realism and detail.
Animating Your Revit Models
Introduction to Lumion Animation Tools
Lumion’s animation tools enable the creation of dynamic presentations by animating Revit models. These tools allow for:
Flythroughs and Walkthroughs: Showcase the design from different perspectives.
Camera Paths: Create smooth transitions and movements within the scene.
These animations provide a more immersive experience for viewers, highlighting key features and design elements.
Creating Effective Animations
To create effective animations:
Plan Camera Paths: Design camera movements to highlight important aspects of the project.
Manage Timing: Ensure that animations flow smoothly and are timed appropriately.
Add Background Music and Narration: Enhance the viewer’s experience with audio elements.
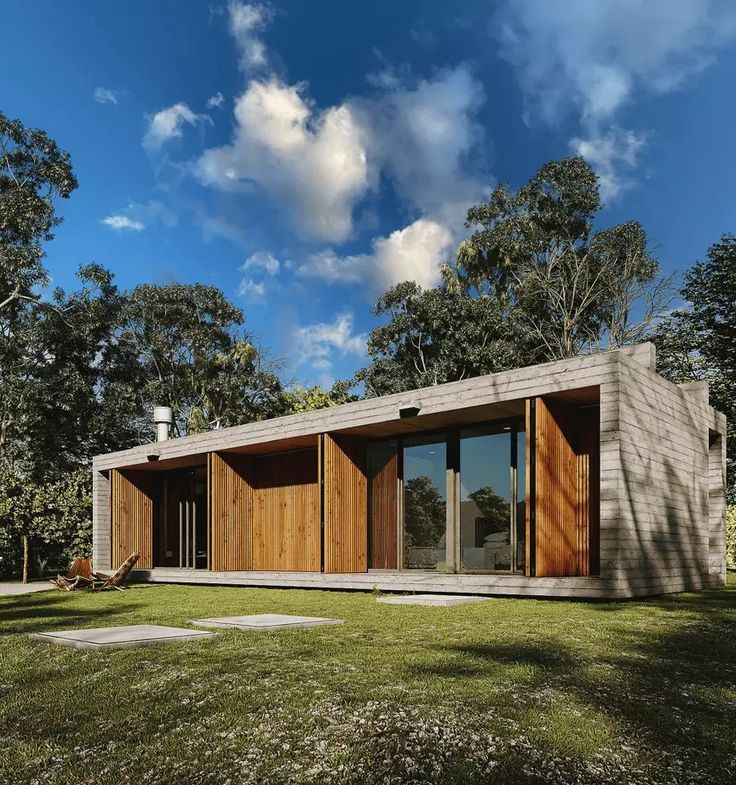
Lumion render_©community.lumion.com
Advanced Techniques for Realistic Visuals
Utilizing Lumion’s Effects
Lumion offers various effects to enhance realism, including:
Weather Effects: Simulate rain, snow, or fog to add depth.
Environmental Elements: Incorporate trees, people, and vehicles to provide context.
Applying these effects helps create a more engaging and realistic visualization.
Adding Context with Surrounding Elements
Including surrounding elements such as landscapes and urban features provides context and enhances realism. Lumion’s asset library includes:
Landscape Features: Add vegetation and terrain elements.
Urban Elements: Include buildings, streets, and other cityscape features.
Optimizing Workflow Between Revit and Lumion
Streamlining Model Updates
Efficiently managing model updates ensures consistency between Revit and Lumion. To streamline updates:
Regularly Update Models: Keep Revit models current and re-import into Lumion.
Automate Processes: Use tools and scripts to manage repetitive tasks.
Managing File Size and Performance
Handling large models and optimizing performance involves:
Optimizing Model Size: Simplify geometries and reduce file size.
Using Proxy Objects: Manage large scenes without sacrificing performance.
Adjusting Rendering Settings: Fine-tune settings for optimal performance.
Conclusion
Mastering the integration of Revit and Lumion empowers architects to craft compelling visual narratives. By optimizing models, leveraging Lumion's features, and refining your workflow, you can produce stunning visualizations that captivate clients and stakeholders. Remember, practice is key. Experiment with different techniques, explore Lumion's capabilities, and stay updated on industry advancements. This collaborative approach will elevate your design presentations to new heights and foster a deeper connection between architects and their audience.
Tired of ordinary? Upskill with BIM architecture! Join our Professional Revit & BIM Certification Course and learn from industry experts. Build a future-proof career. Enroll today!
Visit the Kaarwan website for more insights!
FAQs
Q.1 How to Connect Revit with Lumion?
Connecting Revit with Lumion involves exporting the model in a compatible format (e.g., FBX) and importing it into Lumion. Ensure that export settings preserve textures and scale for accuracy.
Q.2 Is Lumion Compatible with Revit?
Yes, Lumion is compatible with Revit. It supports file formats like FBX, enabling seamless integration of Revit models for visualization purposes.
Q.3 Can Revit Model Be Rendered in Lumion?
Yes, Revit models can be rendered in Lumion. By importing the model into Lumion, you can utilize its advanced rendering features to create high-quality visualizations.
Q.4 Which is Better, Lumion or Enscape?
The choice between Lumion and Enscape depends on your needs. Lumion is known for its extensive library and detailed effects, while Enscape offers real-time rendering and ease of use. Evaluate features based on your project requirements.
Q.5 What Graphics Are Required for Revit?
Revit requires a robust graphics card with at least 4GB of VRAM and support for DirectX 11 or higher. This ensures smooth performance and stability while working with complex models.